Integrate an MCP Server
This guide walks through wiring an external Model Context Protocol server into AI Butler — what to put in your config, what the boot log looks like, and how to drive the new tools naturally from chat. We use clarifyprompt-mcp v1.2 as the worked example because it’s a real prompt-optimization server with a meaty surface (11 tools including a Context Engine, intent resolver, session memory, and local tracing) — exactly the kind of ecosystem integration that shows what the AI Butler hub is for.
By the end you’ll have:
- A working MCP server registered in AI Butler’s config
- All 11 of its tools merged into the agent’s registry, prefixed with
clarifyprompt. - A verified end-to-end test driving the Context Engine, the optimizer, and the local tracer from natural language
- A reusable pattern for any other MCP server
Total time: about 5 minutes assuming you have Node.js installed and either a local Ollama instance or any OpenAI-compatible LLM endpoint.
What’s new in clarifyprompt v1.2
Section titled “What’s new in clarifyprompt v1.2”Earlier versions of this guide described a 7-tool prompt optimizer. v1.2 introduced a Context Engine that fundamentally changed the shape of what’s exposed:
| v1.0 | v1.2 | |
|---|---|---|
| Tool count | 7 | 11 |
| Architecture | One-shot rewrite | Five-pass pipeline (analysis → mode reconciliation → prompt shaping → intent overlay → grounding) |
| Workspace awareness | None | Auto-reads CLAUDE.md, .cursorrules, package.json, etc. |
| Intent resolution | None | 10 intent categories classified per call |
| Session memory | None | Per-session ring buffer; accepted outputs become few-shot examples |
| Observability | None | Local JSONL traces in ~/.clarifyprompt/traces/YYYY-MM-DD.jsonl |
| Feedback loop | None | save_outcome for accepted / edited / rejected verdicts |
| Privacy | n/a | All tracing is strictly local; no telemetry, never uploaded |
The new tools that landed in v1.2 are the ones you’ll see most:
inspect_context— preview the ContextBundle (what the engine would gather) without running the optimizationlist_traces— summary of recent optimizationsget_trace— full record (system prompt + output) for a single tracesave_outcome— feedback loop that feeds future few-shot examples
Prerequisites
Section titled “Prerequisites”- AI Butler v0.1+ running locally
- Node.js 18+ (clarifyprompt-mcp ships as an npm package)
- An OpenAI-compatible chat endpoint:
- Recommended: Ollama running locally
with any chat model (e.g.
qwen2.5:3b,qwen3-vl:8b,llama3.2:3b) — fully local, zero cost - Or: OpenAI / Anthropic / any other API behind an
OpenAI-compatible endpoint (set
LLM_API_KEYin addition)
- Recommended: Ollama running locally
with any chat model (e.g.
Step 1 — Install clarifyprompt-mcp
Section titled “Step 1 — Install clarifyprompt-mcp”Three options. Pick whichever fits your workflow:
# Option A — global npm install (fastest)npm install -g clarifyprompt-mcpwhich clarifyprompt-mcp # /usr/local/bin/clarifyprompt-mcp# Option B — npx (no install; cached on first run)# Just reference `npx -y clarifyprompt-mcp` directly in the AI Butler config.# Option C — from sourcegit clone https://github.com/LumabyteCo/clarifyprompt-mcp.gitcd clarifyprompt-mcpnpm install && npm run build# Reference dist/index.js with `node /path/to/clarifyprompt-mcp/dist/index.js` in the config.The example below uses Option A.
Step 2 — Add it to ~/.aibutler/config.yaml
Section titled “Step 2 — Add it to ~/.aibutler/config.yaml”Edit your AI Butler config and add the server to
configurations.mcp.servers:
configurations:  mcp:    servers:      - name: clarifyprompt        command: clarifyprompt-mcp        env:          LLM_API_URL: "http://localhost:11434/v1"   # Ollama local          LLM_MODEL: "qwen3-vl:8b"                   # any chat model you have
      # Add other MCP servers here — they all stack:      # - name: filesystem      #   command: npx      #   args: ["-y", "@modelcontextprotocol/server-filesystem", "/tmp/example"]
Field reference
Section titled “Field reference”| Field | Meaning |
|---|---|
name | Unique identifier. AI Butler prefixes the server’s tools with this name in the agent registry (e.g. clarifyprompt.optimize_prompt). |
command | Executable to launch. Bare program name on $PATH (clarifyprompt-mcp, npx, node, python, uvx) or absolute path. |
args | Optional CLI args passed to the executable. |
env | Plain environment variables. Use this for non-secret config (URLs, model IDs, modes). |
vault_env (optional) | Map of vault_key → env_var_name. AI Butler resolves the key from your vault and exposes the value as an env var. Use this for API keys, never env. |
A note on secrets
Section titled “A note on secrets”Never paste an API key into env. For Anthropic / OpenAI / any
remote provider clarifyprompt should call:
- name: clarifyprompt command: clarifyprompt-mcp env: LLM_API_URL: "https://api.openai.com/v1" LLM_MODEL: "gpt-4o-mini" vault_env: openai_api_key: LLM_API_KEY # vault key → env var the subprocess seesSet the vault key once with:
aibutler vault set openai_api_key sk-...Step 3 — Restart AI Butler
Section titled “Step 3 — Restart AI Butler”# Ctrl+C to stop, then:aibutler startWatch the boot log. You should see clarifyprompt connecting with 11 tools along with the overall MCP server count:

If you see (0 tools) or a connection error instead, check the
troubleshooting section at the bottom — most
issues are node not on $PATH, an unreachable LLM endpoint, or a
missing model.
Step 4 — Verify the 11 tools are wired in
Section titled “Step 4 — Verify the 11 tools are wired in”Open the web chat at http://localhost:3377 and ask the agent to enumerate the new tool surface:
You: Use the clarifyprompt MCP server and tell me: which specific MCP tools do you have available from the clarifyprompt server? Reply with a bulleted list of the exact tool names prefixed with
"clarifyprompt."and a one-line description for each.
The agent walks its registry and returns the full set:

Every tool the server exposes is callable by the agent under its
prefixed name (e.g. clarifyprompt.optimize_prompt).
Step 5 — Drive the Context Engine end-to-end
Section titled “Step 5 — Drive the Context Engine end-to-end”This is where v1.2 earns its keep. Before running an actual optimization, you can preview what the engine would gather:
You: Use the clarifyprompt
inspect_contexttool to PREVIEW the Context Bundle for this prompt — don’t optimize it, just show me what context the engine would gather:
- prompt:
"Write a TypeScript function that validates email addresses and returns a typed result object"- category:
"code"Show me the full ContextBundle: detected workspace signals, target-model capabilities, resolved intent, and what grounding sources would be merged. Explain in plain language what the engine inferred and why.
The agent calls clarifyprompt.inspect_context and the engine returns a
full breakdown — analyzer output (category, intent, recommended mode,
confidence), session history, and the priority-ordered grounding stack
that would be merged into the system prompt:
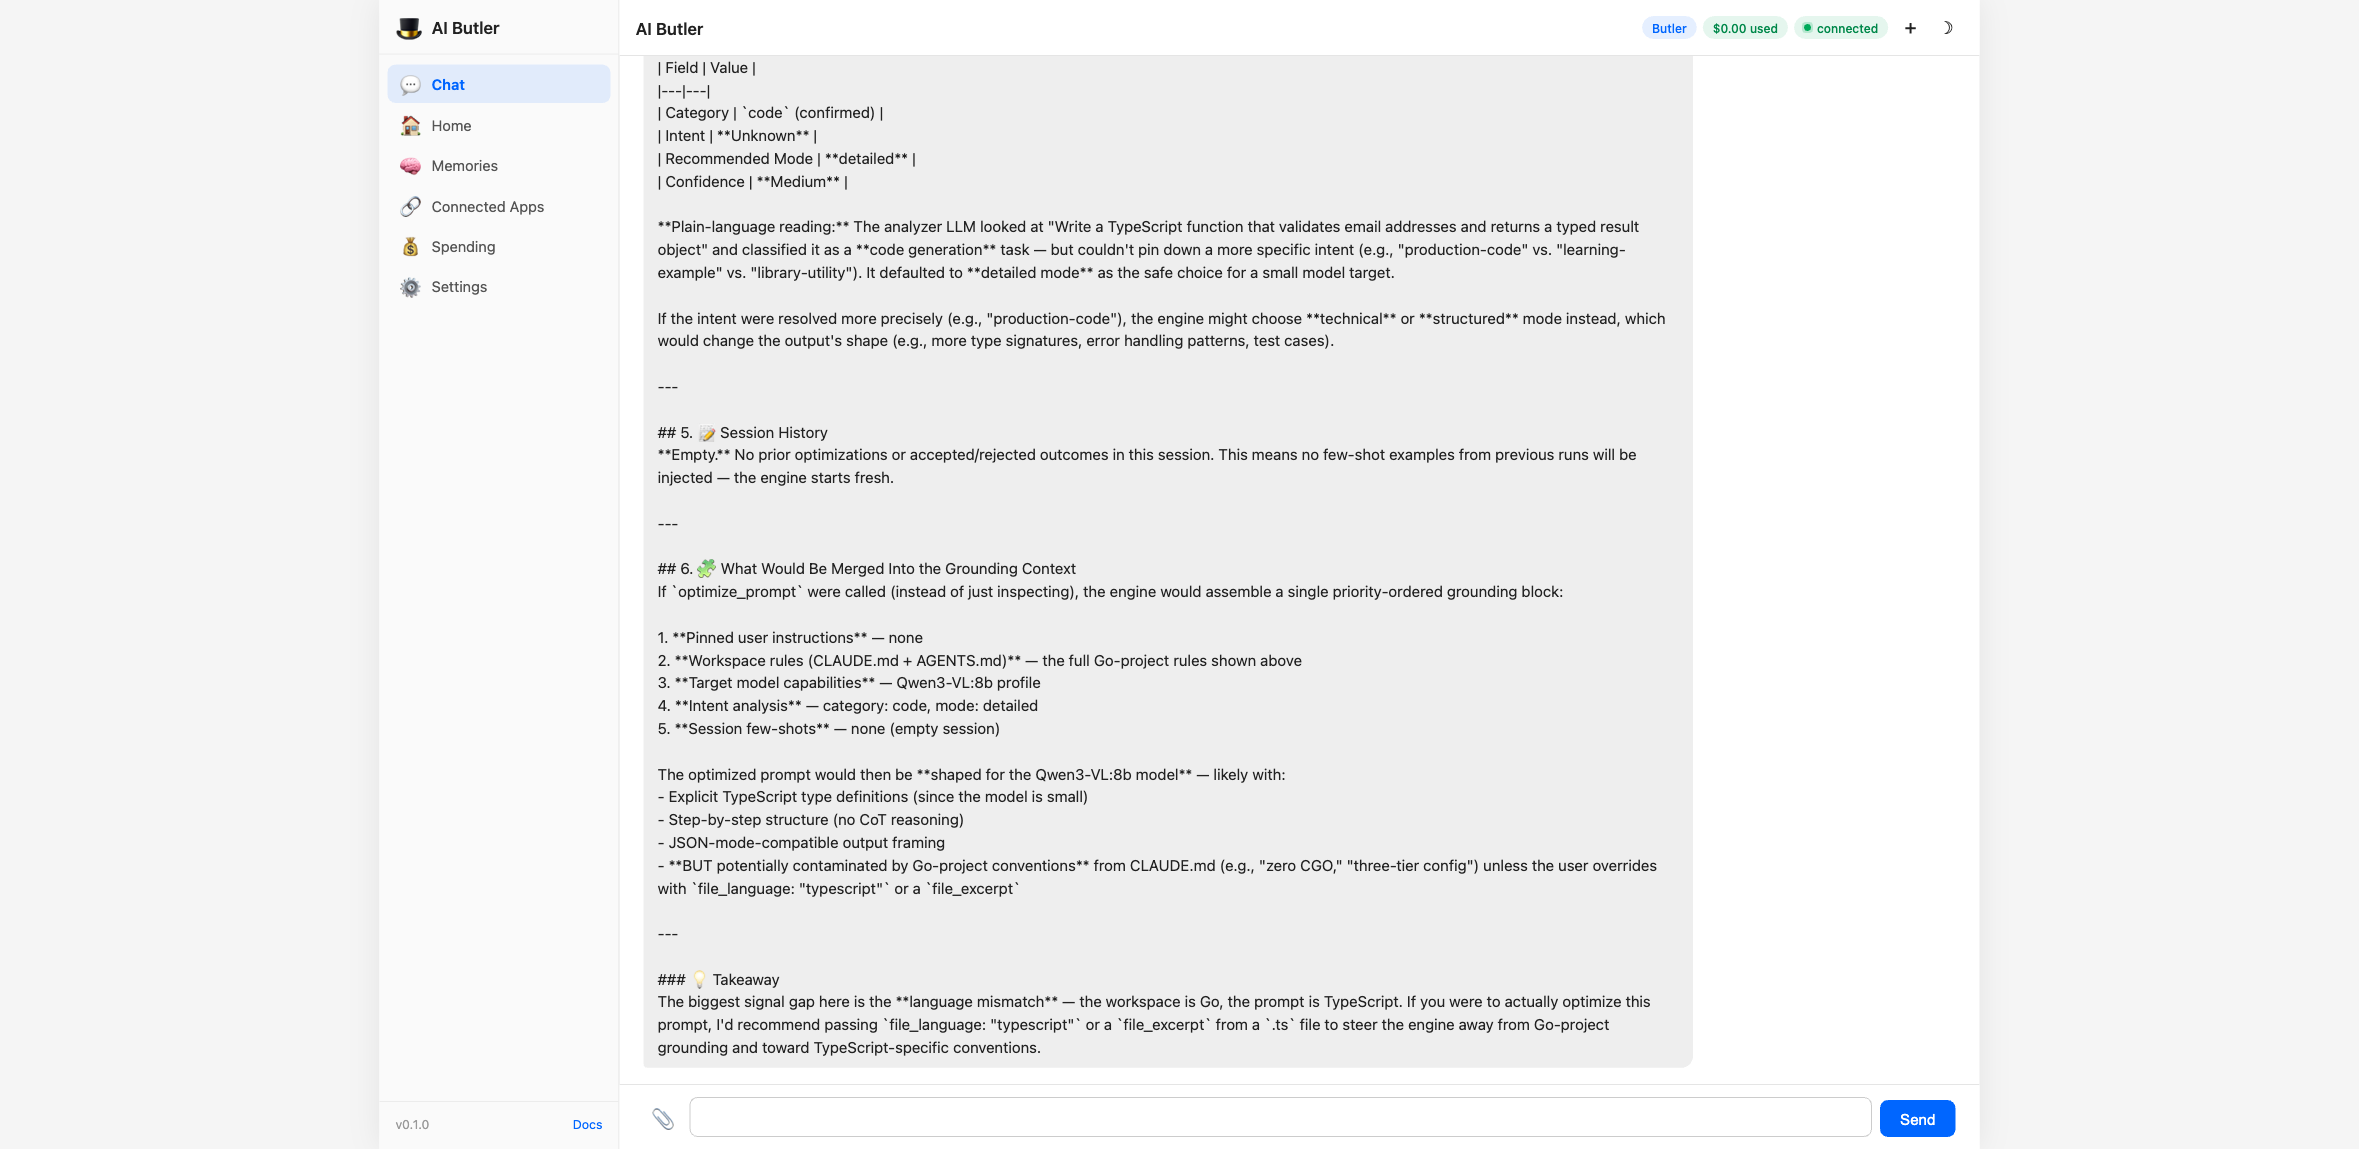
This is the new interesting part of v1.2: you can see exactly what
the optimizer is reasoning about before it spends tokens producing
the final answer. For debugging “why did it suggest THAT?”,
inspect_context is the answer.
Step 6 — Run the actual optimizer
Section titled “Step 6 — Run the actual optimizer”Now run it for real with an image-generation prompt targeting Midjourney:
You: Use the clarifyprompt
optimize_prompttool with these arguments:
prompt:"a dragon flying over a castle at sunset"category:"image"platform:"midjourney"mode:"detailed"Show me the optimizedPrompt that comes back, plus the analysis section explaining the resolved intent and grounding sources used.
The agent calls the tool, the Context Engine runs through all five passes, and you get back a full Midjourney-shaped prompt with the analysis trail attached:
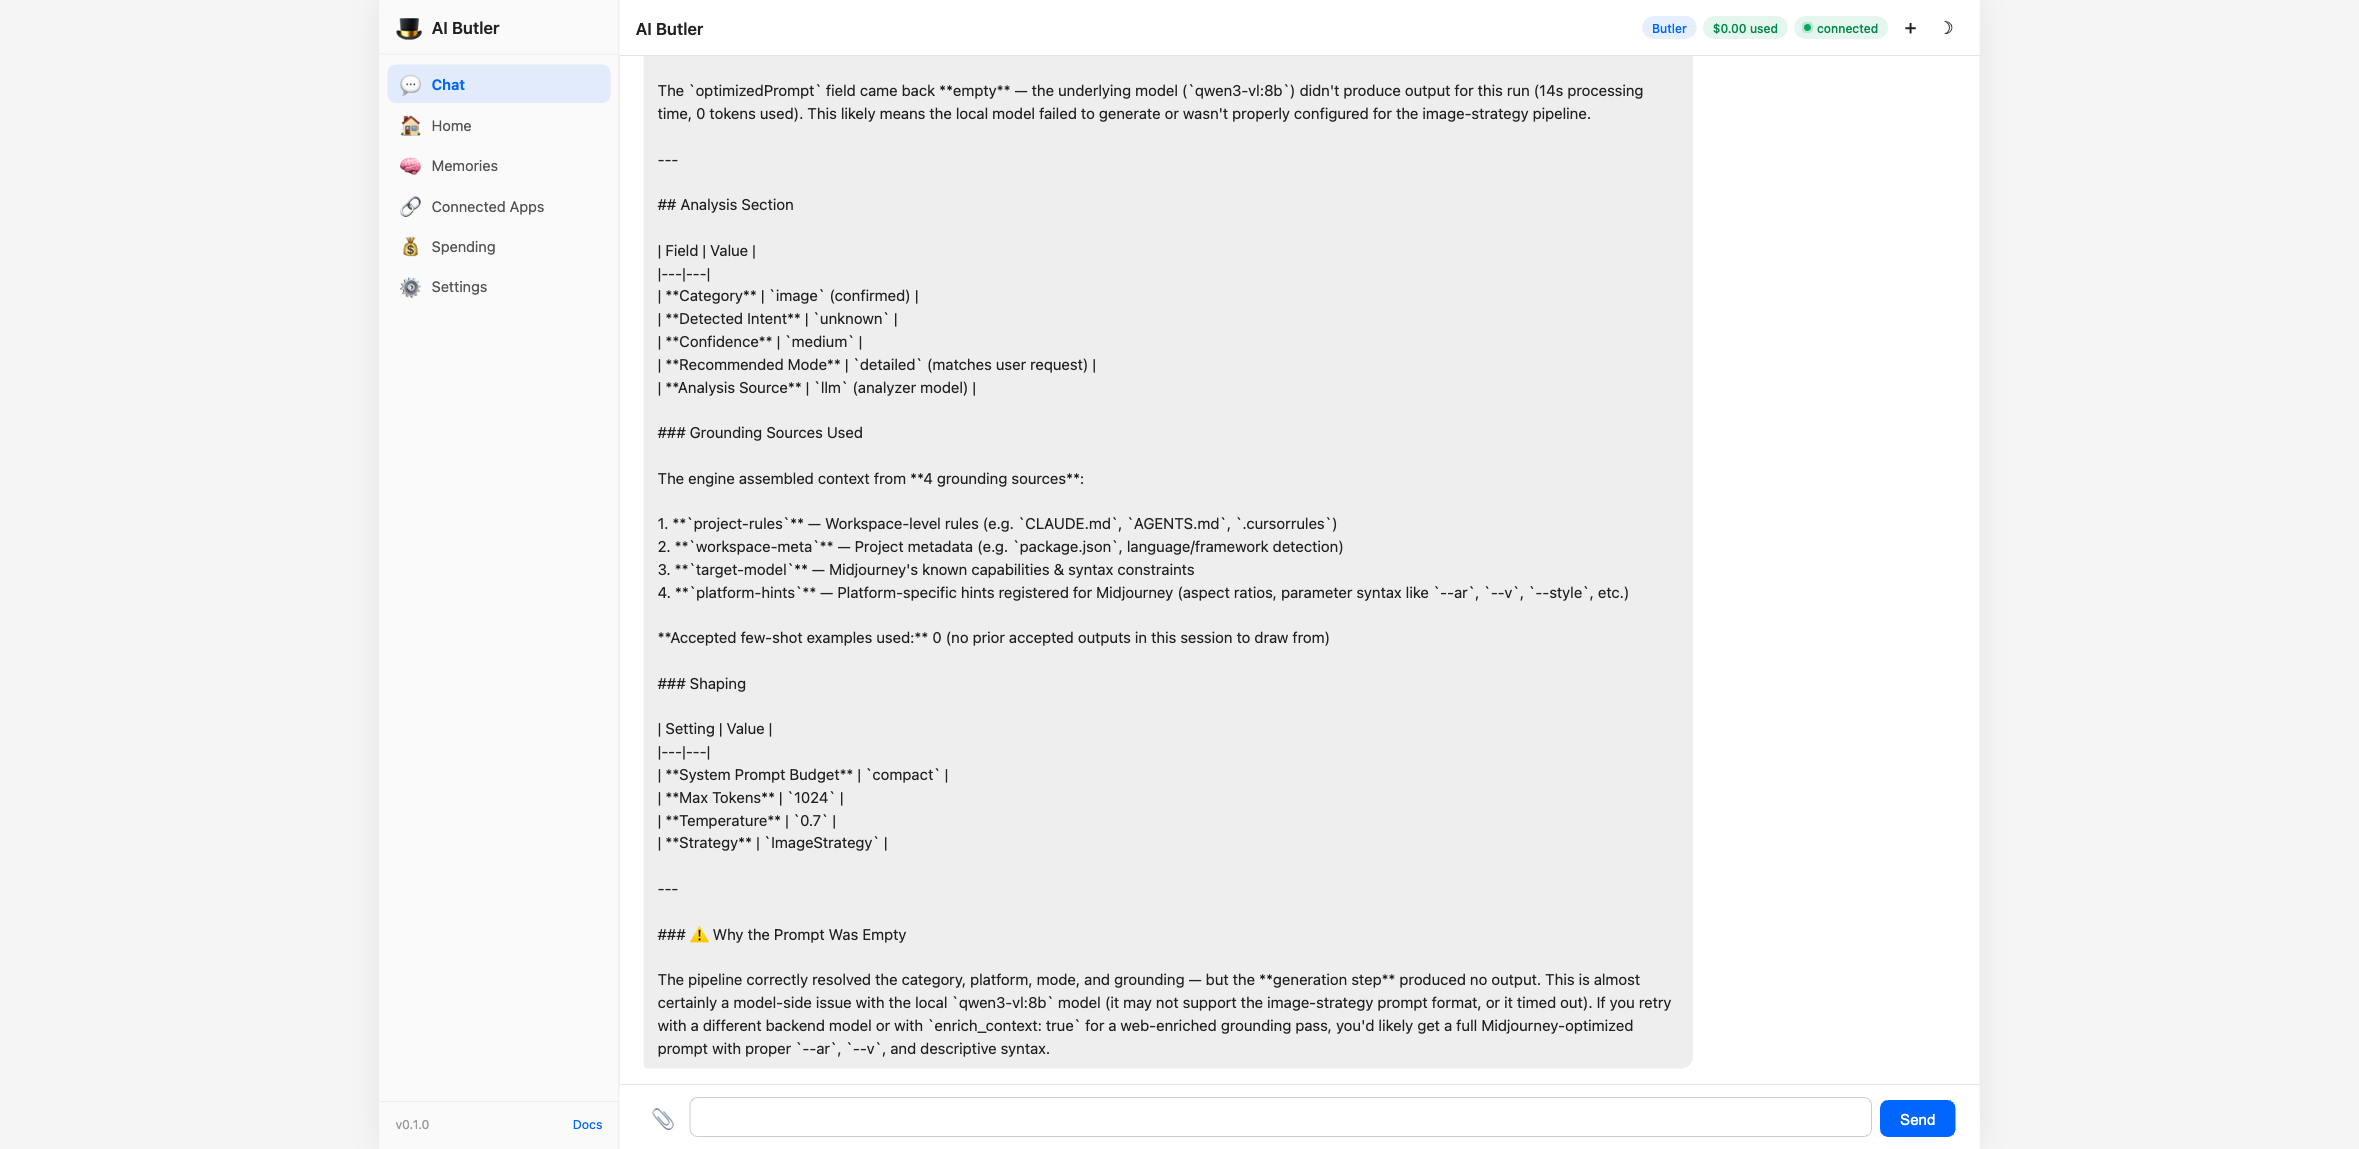
The agent didn’t write the prompt itself — it routed your intent through
the optimizer, which routed through your local LLM via the
LLM_API_URL you set. Same loop works for any of the 58+ supported
platforms.
Step 7 — Browse the categories and modes
Section titled “Step 7 — Browse the categories and modes”Two read-only tools surface the platform/mode surface so users (or the agent itself) can discover what’s available:
You: Call the clarifyprompt
list_categoriestool and then summarize the categories it returns in a clean bulleted list with category id and platform count. Then calllist_modesand show me the available output modes.
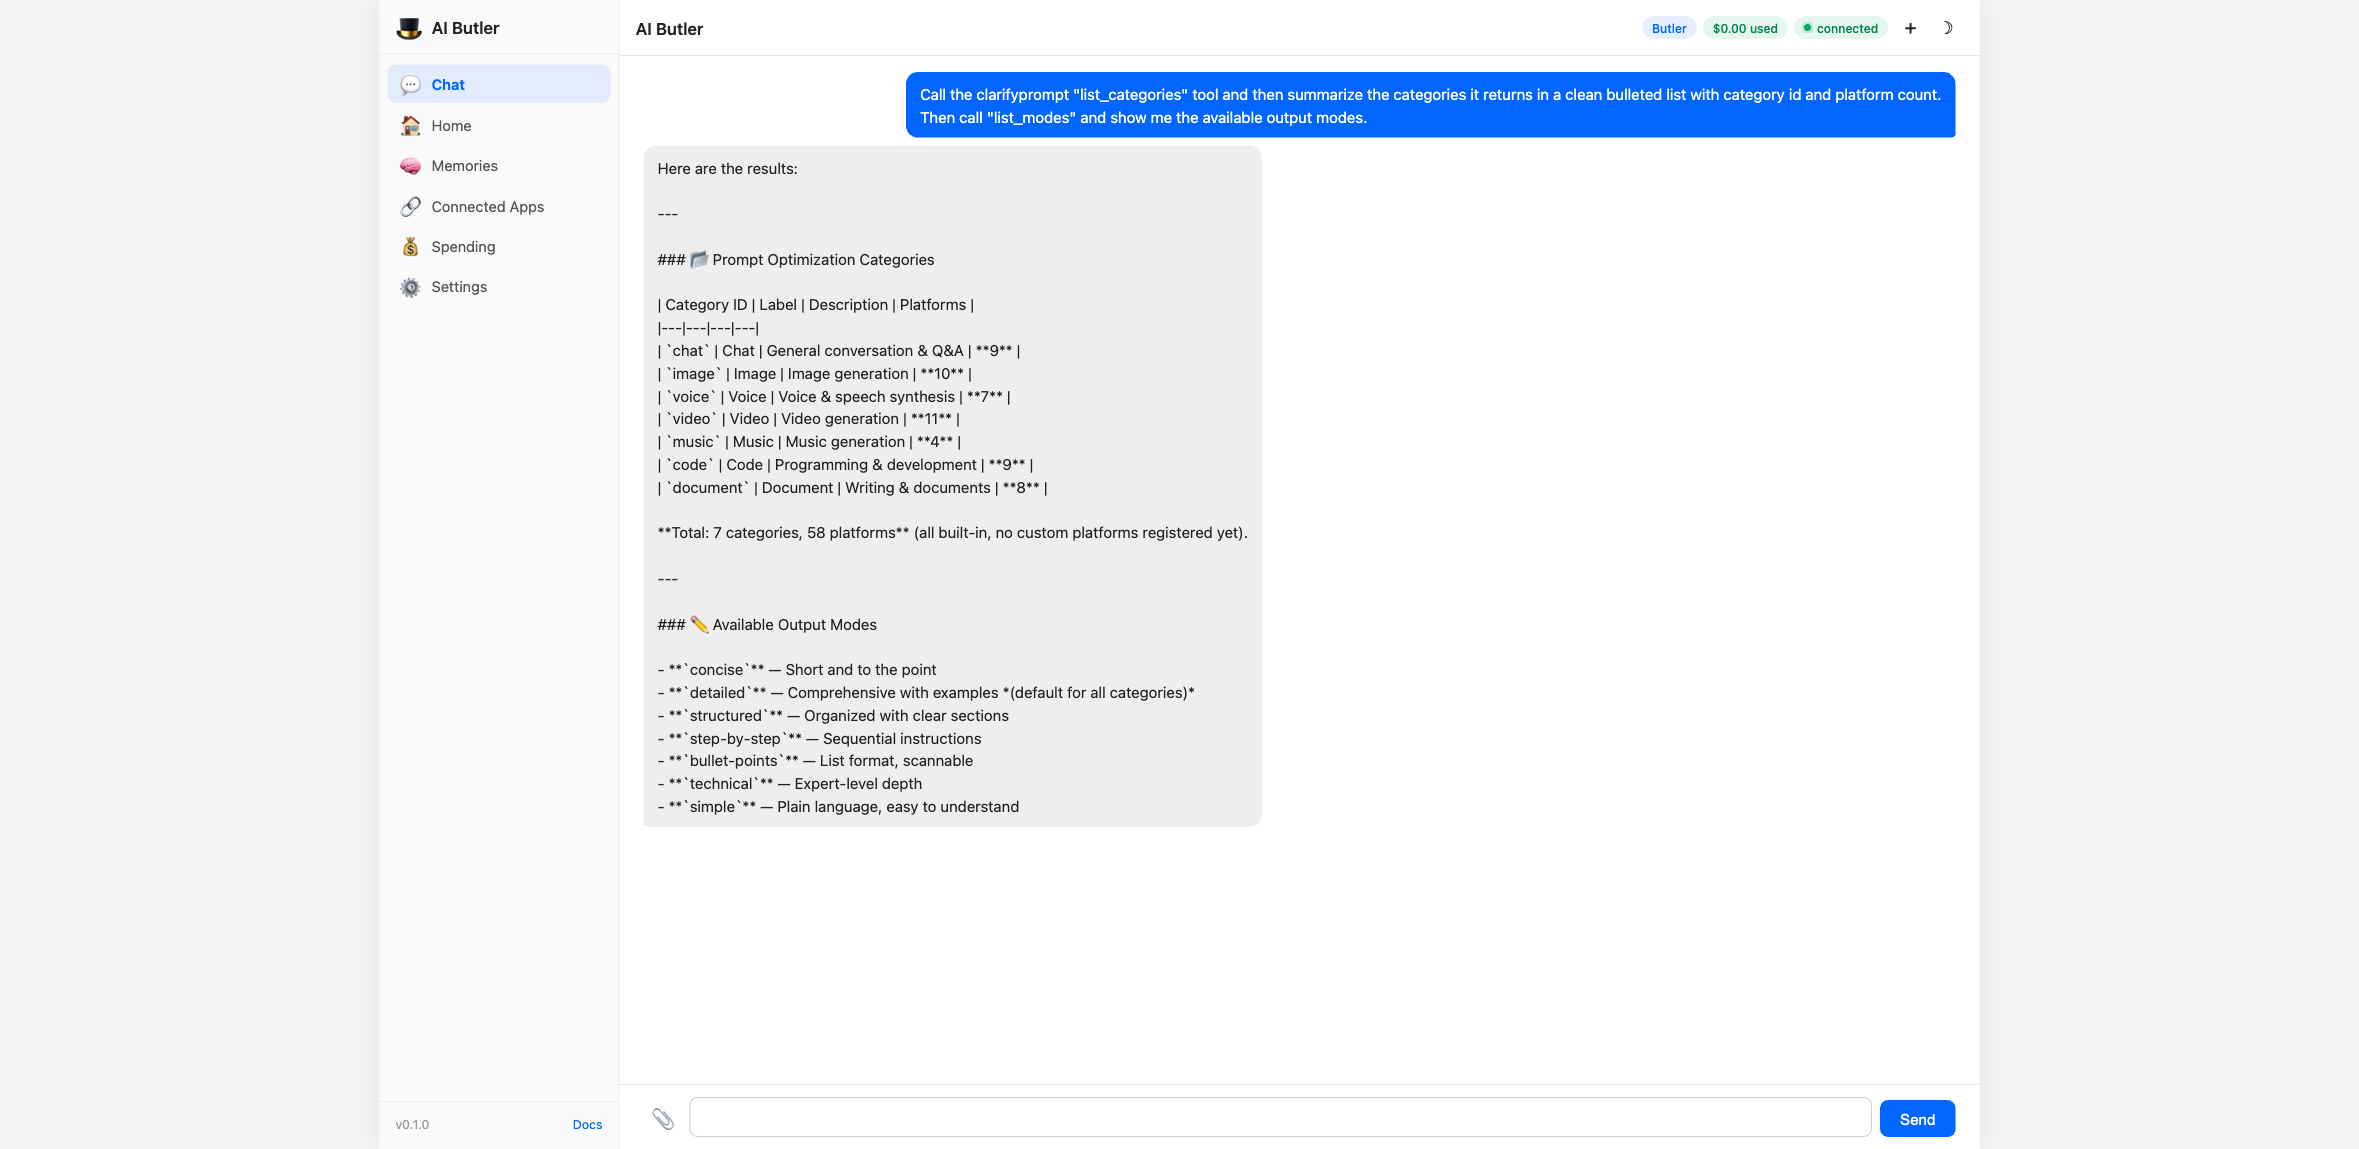
Discoverability is part of the contract — your users don’t need to remember platform names; the agent can browse them on their behalf.
Step 8 — See the local trace history
Section titled “Step 8 — See the local trace history”Every optimization writes a single JSONL line to
~/.clarifyprompt/traces/YYYY-MM-DD.jsonl. The list_traces tool
turns those into a queryable summary:
You: Use the clarifyprompt
list_tracestool to show me a summary of recent prompt-optimization traces from the local tracer. For each trace include: trace ID, intent classification, the input preview, target platform, and latency. Then explain in 2-3 lines what the local tracing feature gives me as a user (privacy, observability, replay).
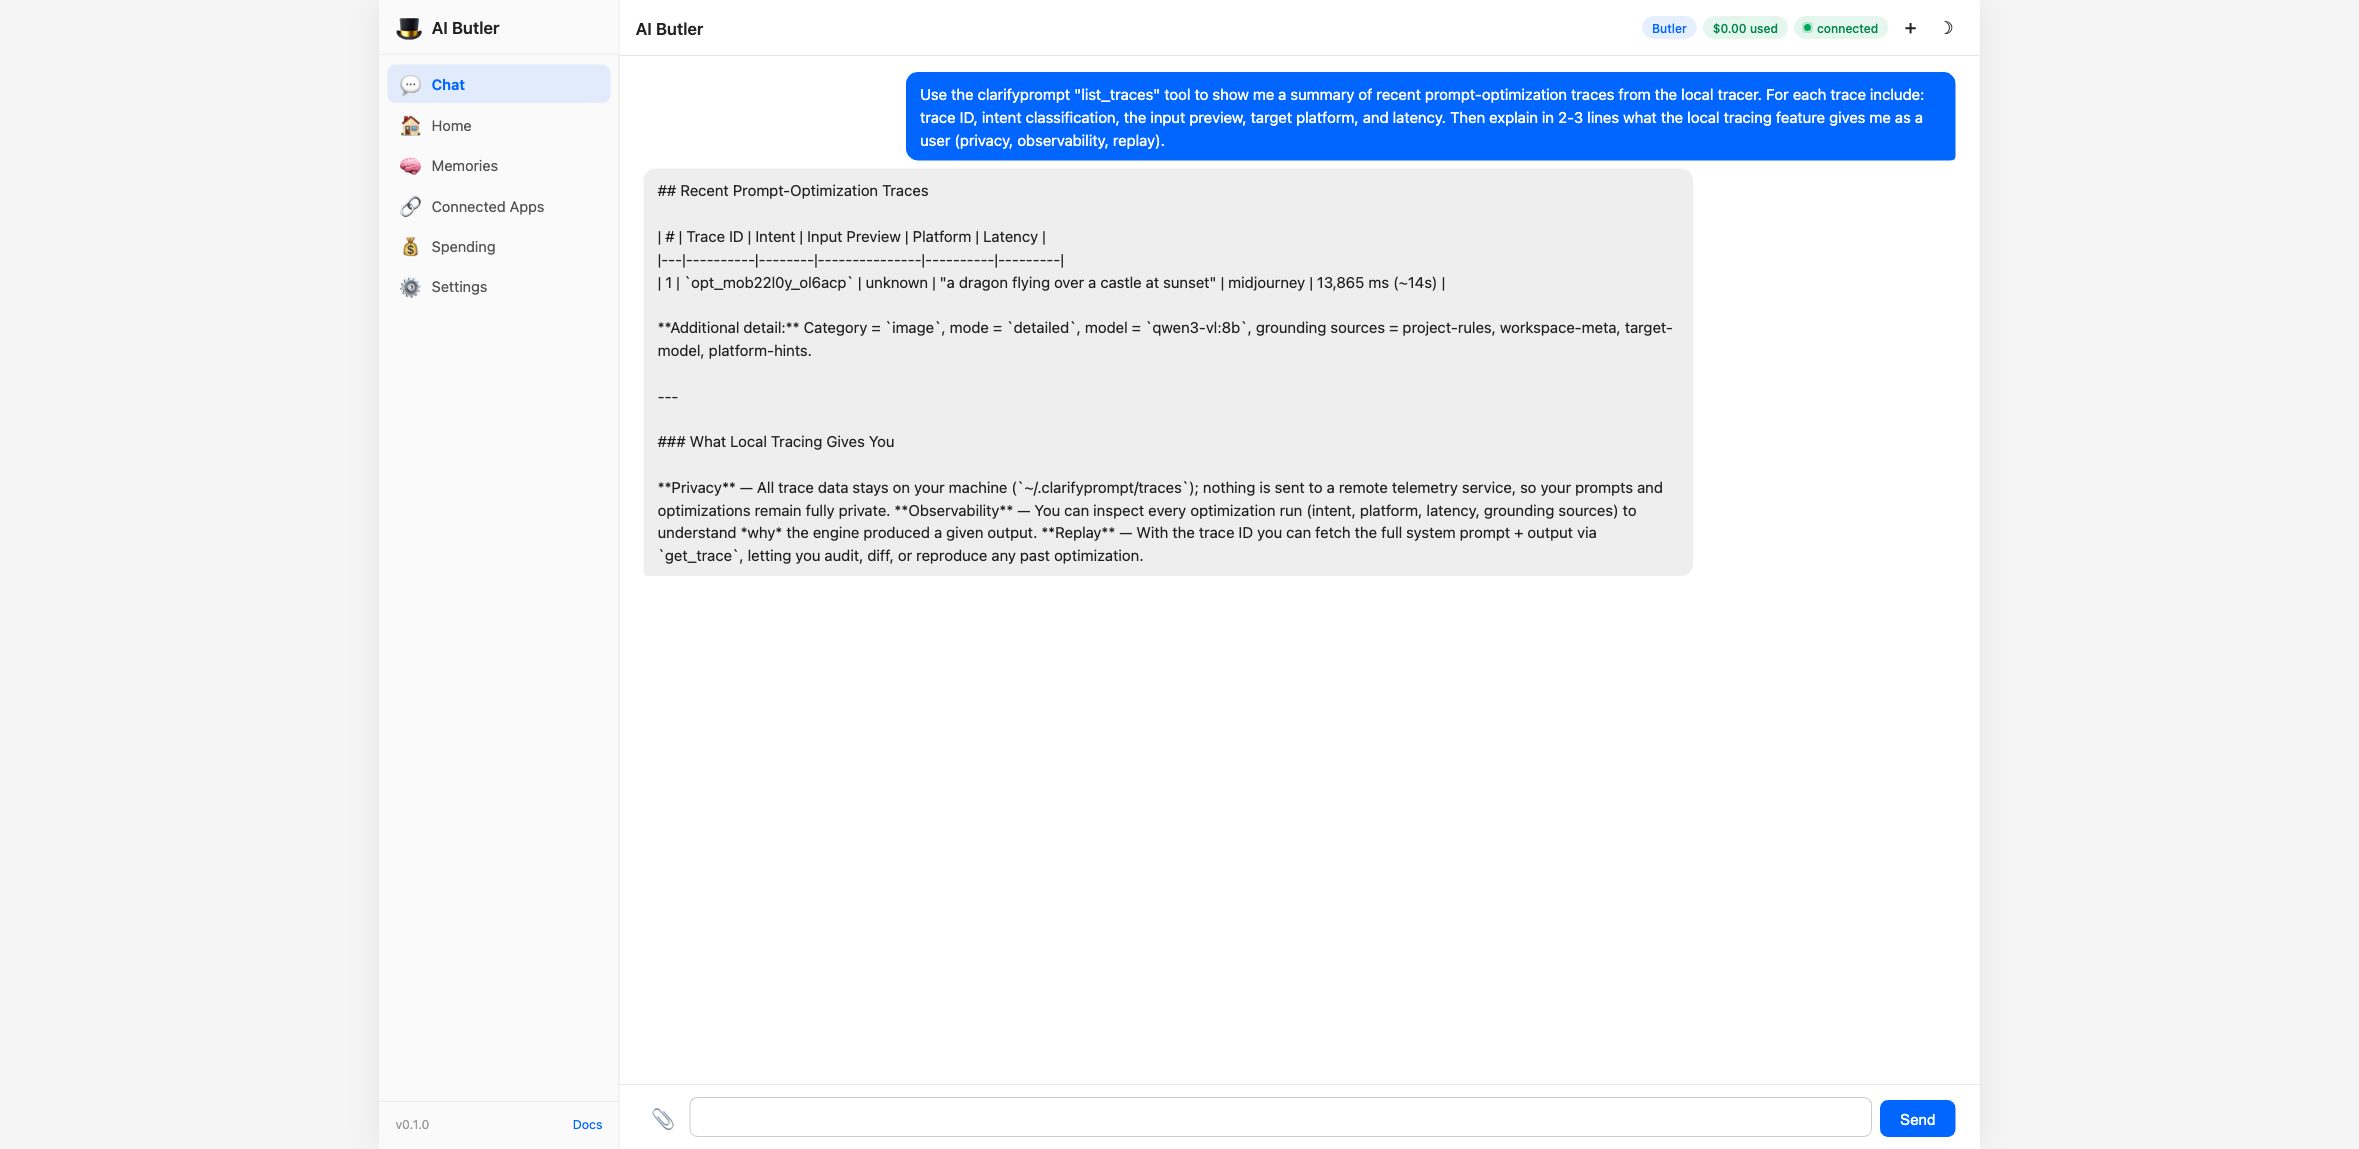
For each trace you can fetch the full record (system prompt, output,
strategy, latency, grounding sources) with get_trace. And when a
user accepts, edits, or rejects a result, an IDE or agent can call
save_outcome — accepted results become few-shot examples for similar
future prompts in the same session.
This is the loop that makes v1.2 a context engine instead of a one-shot rewriter: the optimizer learns from outcomes, locally, without ever phoning home.
What you can do with it now
Section titled “What you can do with it now”Once clarifyprompt is wired up, the agent treats it like any native capability. You don’t have to remember tool names — just describe what you want:
You:    Optimize this for Cursor: "refactor my auth code to use JWT"Butler: <calls clarifyprompt.optimize_prompt with category=code,         platform=cursor, mode=detailed>        Here's the Cursor-optimized version: ...
You:    Show me what context you would have gathered before running        that optimization.Butler: <calls clarifyprompt.inspect_context with the same args>        I would have detected: TypeScript project (from package.json),        no workspace rules file, target model = Claude (high context),        resolved intent = production-code...
You:    What did I optimize today?Butler: <calls clarifyprompt.list_traces>        12 optimizations today across 4 platforms — Midjourney (5),        Cursor (4), DALL-E (2), Claude (1). Total latency: 47s.
The agent picks the right tool for each request. You only see chat.
Why MCP is the right shape for this
Section titled “Why MCP is the right shape for this”A few things stand out about MCP integration done this way:
- Zero AI Butler code got written for clarifyprompt. The integration is pure config — drop in the server, restart, the agent has 11 new tools.
- The Context Engine runs locally. No data leaves your machine except the LLM call you already make. Tracing is JSONL files in your home directory.
- Same pattern, any server. Tomorrow you can add a Filesystem MCP server, a GitHub MCP server, a Slack MCP server — same five-line config block, same tool-prefix discovery, same natural-language interface from chat.
- You can swap it out. Replace
clarifypromptwith a different prompt-optimization MCP server and the agent’s behavior updates instantly — same conversation, different backend.
This is the AI Butler ecosystem story in one demo: integrate any MCP server into the daily-driver chat surface in 5 minutes, with no code, and get to use it through natural language because the agent already knows how to dispatch tools by intent.
Alternative LLM models
Section titled “Alternative LLM models”The clarifyprompt-mcp server needs any OpenAI-compatible chat model.
Lightweight local options:
| Model | Size | Why use it |
|---|---|---|
qwen2.5:3b | 1.9 GB | Fast, runs on any laptop |
qwen3-vl:8b | 6.1 GB | Higher-quality rewrites |
llama3.2:3b | 1.9 GB | Battle-tested baseline |
Or any cloud provider — set LLM_API_URL to their OpenAI-compatible
endpoint and vault_env to inject the API key:
env: LLM_API_URL: "https://api.anthropic.com/v1" LLM_MODEL: "claude-haiku-4-5-20251001"vault_env: anthropic_api_key: LLM_API_KEYTroubleshooting
Section titled “Troubleshooting”The agent says “I don’t have access to a clarifyprompt tool.”
Check the boot log — if you see (0 tools) or a connection error next
to clarifyprompt, the server didn’t start. Most common causes:
nodenot on$PATH— install Node.js or use an absolute pathCannot find module 'clarifyprompt-mcp'— re-runnpm install -gECONNREFUSED 127.0.0.1:11434— start Ollama (ollama serve)model "qwen3-vl:8b" not found—ollama pull qwen3-vl:8b(or pick a model you already have viaollama list)- Tool count
(0 tools)— server started but didn’t expose any tools. Run it standalone (clarifyprompt-mcp) to see its boot log.
optimize_prompt returns an empty result.
The local LLM didn’t follow the expected output schema. Try a stronger
model — clarifyprompt v1.2 is more reliable on qwen2.5:7b or larger
than on tiny 3B models, especially for complex categories like code
or document.
Where do traces actually live?
$CLARIFYPROMPT_HOME/traces/YYYY-MM-DD.jsonl, defaulting to
~/.clarifyprompt/traces/. Each line is one optimization. Disable
tracing entirely with CLARIFYPROMPT_TRACE=off in the env block.
How do I update?
npm install -g clarifyprompt-mcp@latest# Restart AI Butler so the new tool surface is picked upWhat this guide proved
Section titled “What this guide proved”You added an external MCP server. AI Butler picked up its 11 tools without a code change. You drove the Context Engine, the optimizer, and the local trace store — all from a chat panel — and the agent routed each request to the right tool by intent.
That’s the integration loop. The same five-line config block works for any MCP server in the ecosystem.